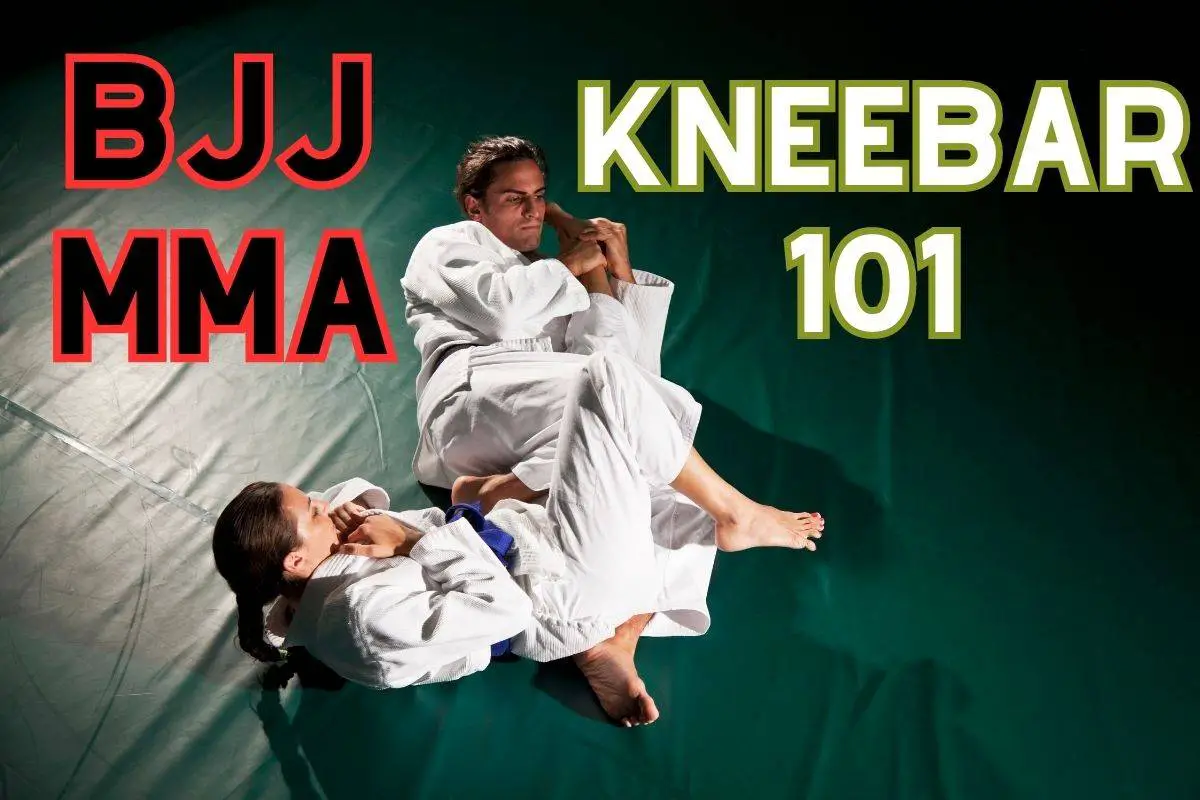
I’m a big fan of leg locks in BJJ, especially the Kneebar. By learning it, you’ll be able to hone your grappling style and change your perspective. You’ll be able to be more unexpected and adapt to your opponents faster, meaning that you’ll be a much better grappler.
The Kneebar utilizes hyperextending the knee by stretching the entire leg backward. It’s an excruciating and uncomfortable submission, so your opponents will tap out quickly when you perform it correctly. You can also perform it from many positions, such as half guard, open guard, side control, and butterfly guard.
This article will be valuable to you because it can be your go-to walkthrough guide to perfecting this great leg lock. In addition, you’ll be able to skip many trials and errors because I review mistakes that many novice grapplers make when they first learn the Kneebar.
And, of course, I offer practical solutions to such mistakes.
As a result, you’ll be able to save a lot of time by experiencing these mistakes yourself. If you implement this submission correctly by using the steps I’m offering you in the following section, you’ll be able to perfect the Kneebar in no time (and win more fights using it.)
Here’s what this article will cover:
- A Step-By-Step Breakdown
- Different Variations
- Tips (How to Win More Fights)
- Breaking down common mistakes
- Practical solutions to these mistakes
- Q&A
- Conclusion
So I hope you’re ready to read a step-by-step breakdown of the Kneebar; it’s up next.
How to Perform the Kneebar
This 1st part of the article will be about breaking down the simplest variation of the Kneebar. Now why did I choose this variation particularly? Honestly, it’s the most straightforward one, and you’ll be able to learn and start using it in no time.
It’ll be better if you don’t start with the most complicated submission and dial it down from there. Instead, you want to start with the straightforward stuff and advance to the more advanced techniques later.
A video at the end will show this process through, so ensure you stick through to the end to grasp this technique better.
But for now, please stick with this variation. Start perfecting it, and you’ll see more results and more wins. So let’s dive into the first step.
Step #1 – Start in a crouching position
The first step will be to begin in a crouching position. You want your opponent to almost have the open guard on you, but a bit earlier than that. Once you’re in this position, you’ll be ready to advance.
Step #2 – Grab the knee
The next step is to grab the opponent’s knee. At this point, he’ll know what you’re planning if he’s advanced. In addition, he’ll know you’re going for a leg lock even if your opponent is a white belt, as you’re explicitly targeting the leg.
Some will suggest being more stealthy about it and going for an upper-body fake. However, it’ll be worth it not to go for it at your current skill level with the Kneebar.
Instead, focus on the leg.
You should grip the opponent’s knee by going under the leg and grabbing the top. You’ll have more control in the future by going about it that way.
Step #3 – Fake passing the opponent
The next step will be to fake passing the opponent. So I previously mentioned that you should not fake stuff; what has changed? This fake is critical to your success rate with this Kneebar variation.
You want to fake passing the opponent to get more wins using it. Being more stealthy and unexpected is almost always positive unless you go too far.
But ensuring you’re not overdoing it is a critical component of a solid grappler. By fake passing the opponent (you might want to start moving to the side, for example), the opponent will have no idea of your plans.
You can fake guard passing in many ways, such as going for the Knee Slice or the Toreando (although you’ll be crouched.) But you can stand up and fake going for the side using any pass you want.
And if you want to learn about BJJ’s best guard pass, follow this link.
Step #4 – Sit up while stepping over the opponent
Alright, so you should have a solid knee grip at this point. I want you to maintain it throughout the entire execution. You’ll see how your initial grip influences your finishing move at the end. But in short, the better grip you have, the more pressure you’ll inflict, and the faster the opponent will tap.
The following step is to sit while stepping over the opponent. You have faked a pass, and so the opponent is confused. Now in one swift motion, you want to step over the opponent and land facing the other direction.
But wait, I’m too far into the future.
Steps #4, #5, and #6 are one quick motion. Stepping over the opponent is the first of this combination. So now, let’s dive into #5.
Step #5 – Twist your body
The 2nd part of the one quick motion is to twist your body. You want to step over the opponent while twisting your body.
Spoiler alert, we’re aiming for you to sit parallel to the opponent (facing the same direction) while having a solid grip over his knee. Reach this position, and you’ll get the tap.
This is why I’m emphasizing that you must get this right. You want 4, 5, and 6 to be extremely quick. The opponent will escape or defend your offensive moves if you take your time performing them.
I’m all about being technical, but it’s not what our focus should be in this specific case.
Step #6 – Sit parallel to the opponent while gripping his knee
The last motion of the combination is to sit parallel to the opponent while maintaining a solid knee grip. To recap, you’ve grabbed the knee, stepped over while twisting in the other direction, and sat parallel to the opponent while maintaining a knee grip.
Great.
Again, you want to perform this motion swiftly. Please don’t hesitate with it, or the opponent will leave you vulnerable. If that happens, he can counter and follow up with his own submission. You want to avoid that.
But you’re not done yet.
Step #7 – Lean on your shoulder (lean back)
The next step will be to lean on your shoulder (leaning back, essentially.) Remember, you aim to hyperextend the opponent’s knee and cause much physical pain. Thus, you want to gain as much leverage as possible.
And gaining leverage and more control is difficult, especially if you’re not keen on learning more positions and techniques. But you’re reading this article, so you’re eager to learn more positions and learn more techniques.
Because you lean back, you have more space and leverage to hyperextend the opponent’s knee. Can you imagine submitting the opponent while sitting down and not having his knee entirely in your control? I can’t, but maybe you’ll be able to do that.
Eventually, you want to lean on your shoulder and maintain reasonable control over the opponent’s knee. Do that, and the last step is all yours (the finishing move.)
Step #8 – Hyperextend the knee (the entire leg)
The finishing blow will be to hyperextend the opponent’s knee. Reaching this step without facing any defense means from the opponent’s side can be difficult. However, with experience and practice, you can counter the opponent’s defensive moves.
For instance, the opponent might lock his legs when you lean back (last step.) That’s an obstacle you want to overcome. What do you do then? Your best shot will be to break his grip using your other hand or your feet. Your feet should be free to work so that they can help you in this case.
Another option you have is transitioning to another leg lock, such as the Toe Hold or Heel Hook. You can also go as far as transitioning to side control or even full mount if you see the opponent is overly defensive.
From there—you’ll be able to finish the fight by going for another submission, such as the Americana or any other side control finishing submission.
Hopefully, you’ve reached this final step and hyperextended the opponent’s knee. Another thing you can do to apply more pressure is to pinch the opponent’s foot while lifting his heel upward. That will create more leverage and pressure and allow you to get the tap out more effectively.
Indeed, a lot of pressure.
Step #9 – Wait for the tap
The last step is to wait for the tap. I always include this step in my breakthroughs for one simple reason: it can be easy to injure your training partner by not letting go of the pressure.
Or, perhaps you’ve been overly excited by getting the submission, and you applied too much pressure. I see such a case often with grapplers who have their first few tries with the Kneebar.
They’ll do everything flawlessly but slowly apply pressure (hyperextending the knee). They’ll be eager to finish the fight and grab the victory, so they’ll apply pressure quickly and not pay attention to the opponent.
Please be careful when performing the Kneebar; it’s highly effective and can seriously hurt someone.
On a more optimistic note, you’re now a grappler who can use the Kneebar to finish more fights using it. You’re essentially more competent.
It would be best if you didn’t wait before practicing this submission. After that, you’re ready to start learning and mastering it. But before you do that, the next section will discuss more variations you’ll enjoy learning.
Learning these variations will allow you to be a more dynamic grappler, capable of finishing more fights using Kneebars. So let’s dive in!
Kneebar Variations
The 2nd part of this article (this one) will be all about variations. I always include this type of section in my technique breakthroughs because I’m confident that learning more means improving.
Learning more is everything. Red belts in BJJ never stop learning. They’ve been training BJJ for over 60 years and admit not knowing everything. So how can you stop learning?
I encourage you to experiment with all these Kneebar variations, as all of them are highly effective leg locks.
Alright, I hope you’re ready for some hardcore (I wish) learning!
#1 – Kneebar From Butterfly Guard
The 2nd variation we’ll discuss is one of the most beautiful leg locks I’ve seen. What’s so fantastic about it is that it’s also highly effective. You can use it against novice and advanced grapplers, making it more attractive to all grapplers.
Without too much introduction, here’s how to perform the Kneebar from the butterfly guard:
- Start in the butterfly guard
- Elevate the opponent
- Turn around
- Bring your leg around the opponent’s leg
- Lock (Triangle Lock)
- Grab the opponent’s ankle
- Lock
- Hyperextend the leg
- Wait for the tap
I encourage you to learn this variation as soon as you learn leg locks. Although there are more accessible alternatives, such as the Straight Ankle Lock, you can experiment with both to keep honing your grappling skills.
#2 – Kneebar From Half Guard
The Kneebar from the half-guard position is a pretty complicated set of moves. However, once you get a feel of this variation, you can use it against multitudes of BJJ grapplers, including advanced grapplers.
You can only use the Kneebar from the brown belt, according to IBJJF (more on that later.) And so, at this point, you should be capable of performing it flawlessly.
Here’s how this variation plays out:
- Start in the half guard position
- Grip the opponent’s collar
- Push yourself under the opponent
- Overhook the opponent’s leg
- Rotate yourself while pushing the opponent
- Lock the opponent’s leg
- Turn to the side
- Apply pressure
- Wait for the tap
#3 – Kneebar From Open Guard
The Kneebar from open guard is a submission I think deserves its spot in the most beautiful BJJ techniques list. I think I’ll create this list and include this variation in there. Stay tuned for that! 🙂
Anyways, it’s also practical and will allow you to start submitting your opponents using it. Let’s see how you perform it yourself:
- Start in the open guard position
- Hook your hand under the opponent’s leg
- Place your other side foot on his hips
- Using your other leg, hook and wrap your legs together
- Move until you get this grip locked
- Rotate and allow the opponent to fall
- Hook the opponent’s leg
- Place your hand under the opponent’s arm
- Apply backward pressure
- Wait for the tap
Alright, this is a complicated move. So here’s another demonstration (visual aid.)
Eventually, learning all these variations will help you become a competent grappler. Therefore, I invite you guys to read the following section, which will help you avoid common mistakes that novice grapplers typically make.
Even advanced grapplers fall prey to these mistakes, so here are 5 tips you want to implement into your leg lock game to perfect your Kneebars and win more fights using them.
Kneebar Tips (Win More Fights)
Alright, we reached the part of the article that’s about tips and fixing common mistakes.; how time flies!
You’ll be able to gain the knowledge to start implementing specific tips that’ll boost your leg lock game from this section.
The tips are essentially solutions to common mistakes novice grapplers make. Thus, ensure you read carefully since I always include another tip or offer you another solution to the same or other mistakes.
Tip #1 – Sit tightly to the opponent’s leg
The first tip is to sit tightly to the opponent’s leg. Many novice grapplers who learn the Kneebar create much space between themselves and the opponent’s leg.
What that does is allows him to maneuver his leg according to his desires. So, for example, he’ll be able to turn around and escape your lock. To put it another way, he’ll gain the fight’s advantage, as you’ll be more vulnerable than your opponent.
But if you sit tight and minimize the space between you and the opponent’s leg (the one you’re targeting), your lock will be tighter, making your execution more likely to work.
Tip #2 – Scoop back if the opponent defends
The 2nd tip (solution to a common mistake) is to scoop back if the opponent defends. Why should we do that?
Leaning back will create more space between you and the opponent. But how can that be any good? Well, there’s one primary benefit you’ll be gaining from scooping back and watching the opponent when he defends.
You’ll be able to identify weak points you can start attacking. The opponent can’t defend everything. He won’t be able to protect his leg and neck, or at least not proficiently. That’s good news because you can now attack more effectively.
Scooping back when he defends will give you a better view of the fight. Also, it’ll allow you to attack more precisely, which is what you want to do.
Tip #3 – Learn and experiment with all the variations
The next tip will be to experiment will all variations. You want to have as much knowledge as possible to be as dynamic as possible.
BJJ is like chess in that sense. However, learning more moves and entries will allow you to enter more smoothly and finish more fights.
You’ll become more unexpected.
Here’s a call to action: learn and experiment with all the Kneebar variations in this article. How do you do that? You start by learning one variation and trying it in a few spars. Then, you learn another one and follow it up with actual implementation. The same applies to all of them.
Now your body will start to develop muscle memory, and you become a grappler capable of using Kneebar like it’s his second nature.
That’s the beauty of effective learning.
Tip #4 – Use the opposite grip for more pressure
The 4th tip is to use the opposite grip or apply pressure from the other side to create more pressure when you finish the Kneebar.
How does that look, one might ask?
When you’re in Kneebar’s last step, to apply pressure, you have two options. The first is to apply the pressure from the direction that makes sense (the one that doesn’t require you to manipulate your arm.)
But you have a second option which will allow you to create more pressure and get the tap out quicker. This option is to come from the opposite side and apply pressure in the same direction.
That will allow you more pressure than the usual grip. Here’s how it looks:
Tip #5 – Fight for control (if the opponent defends)
BJJ is all about control. You must fight for that control if you want to improve your win-loss ratio. Your opponent will do anything to get a superior hand on you.
You want to do the same, especially with leg locks.
Your aim is to gain the superior hand, or more control, over your opponent. That will give you more options to maneuver him and you according to what you’re going for. For example, if you’re going for the Kneebar, you want to gain control over his leg, which is not easy to get.
BJJ really is like chess, and you want to control the fight as much as possible. Fighting for control will be worth it; trust me, the opponent will do the same. Following this tip will give you more wins!
Now, let’s move over to the last section of this article: Common Q&A
Which Martial Arts Teach the Kneebar?
MMA and BJJ teach the Kneebar, as both teach ground grappling. However, it originates from Brazilian Jiu-Jitsu, as it’s the primary source of knowledge about leg locks. MMA, however, has implemented leg locks into its martial art, as they’re a set of highly effective techniques.
What Belt Do You Have to Be to Kneebar?
You must be a brown belt to perform the Kneebar in BJJ legally. That said, some BJJ tournaments won’t restrict the techniques you use according to your belt. However, the IBJJF will restrict using most leg locks until you’re a brown belt.
Is the Kneebar Legal in IBJJF?
The Kneebar is a legal submission in official BJJ tournaments and IBJJF tournaments. That said, you can’t use it until you’re a brown belt, as you can seriously hurt your partner if you misuse it or apply too much pressure. You can use only one leg lock before that, the Straight Ankle Lock.
Final Words
This complete guide was hard to write. However, it made me step out of my comfort zone and start learning more, even though I already knew it.
However, I and probably you aren’t as proficient as we think we are. We must always strive for more learning, and this breakdown was my platform to learn more and become a more dynamic grappler, so there’s something to be proud of!
Eventually, the Kneebar is one of BJJ’s most effective leg locks. It’ll allow you to cause a lot of pain quickly. Therefore, there isn’t much to lose by learning this leg lock, although it can be frustrating to understand at first, as some of its variations are more complicated.
The Kneebar, however, isn’t the most effective leg lock. If you want to learn what are the most effective leg locks, follow this link.
And here are other articles you will like reading if you read thus far into this article:
Estima Lock BJJ Complete Guide